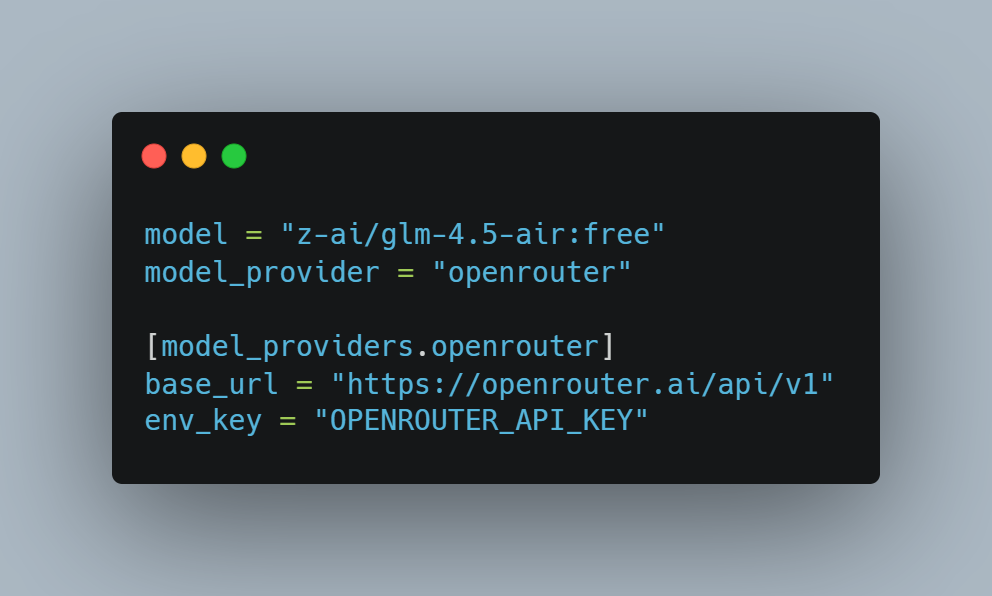
Quick setup: After installing Codex CLI, it automatically creates a default configuration file under your user directory: Windows: Linux / macOS / WSL: Then you just edit that file,→ add the [model_providers.openrouter] section,→ and update the existing model and model_provider lines, like this: Then run: Views: 1099
Development / Javascript / NodeJS / Technology
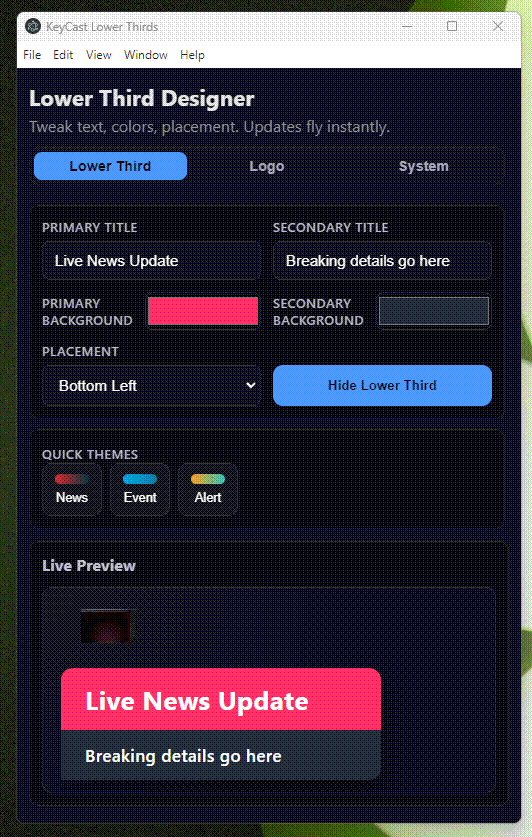
Built a new toy: KeyCast Lower Thirds—Electron + React app for instant lower-third graphics
I’ve been obsessed with how Japanese TV shows composite animated lower thirds over live footage—those layered graphics that somehow feel both playful and precise. To learn the craft, I built KeyCast Lower Thirds, an Electron + React app that mimics broadcast workflows without the usual control-room headaches. You get a clean operator panel, a fullscreen kiosk output, and real-time sync between the two. Toggle text, colors, placements, and animated logos instantly, then ship the feed straight into OBS or an ATEM via chroma key or alpha workflows. In practice, it’s become my sandbox for experimenting with conference graphics, live presentations, […]
Uncategorized
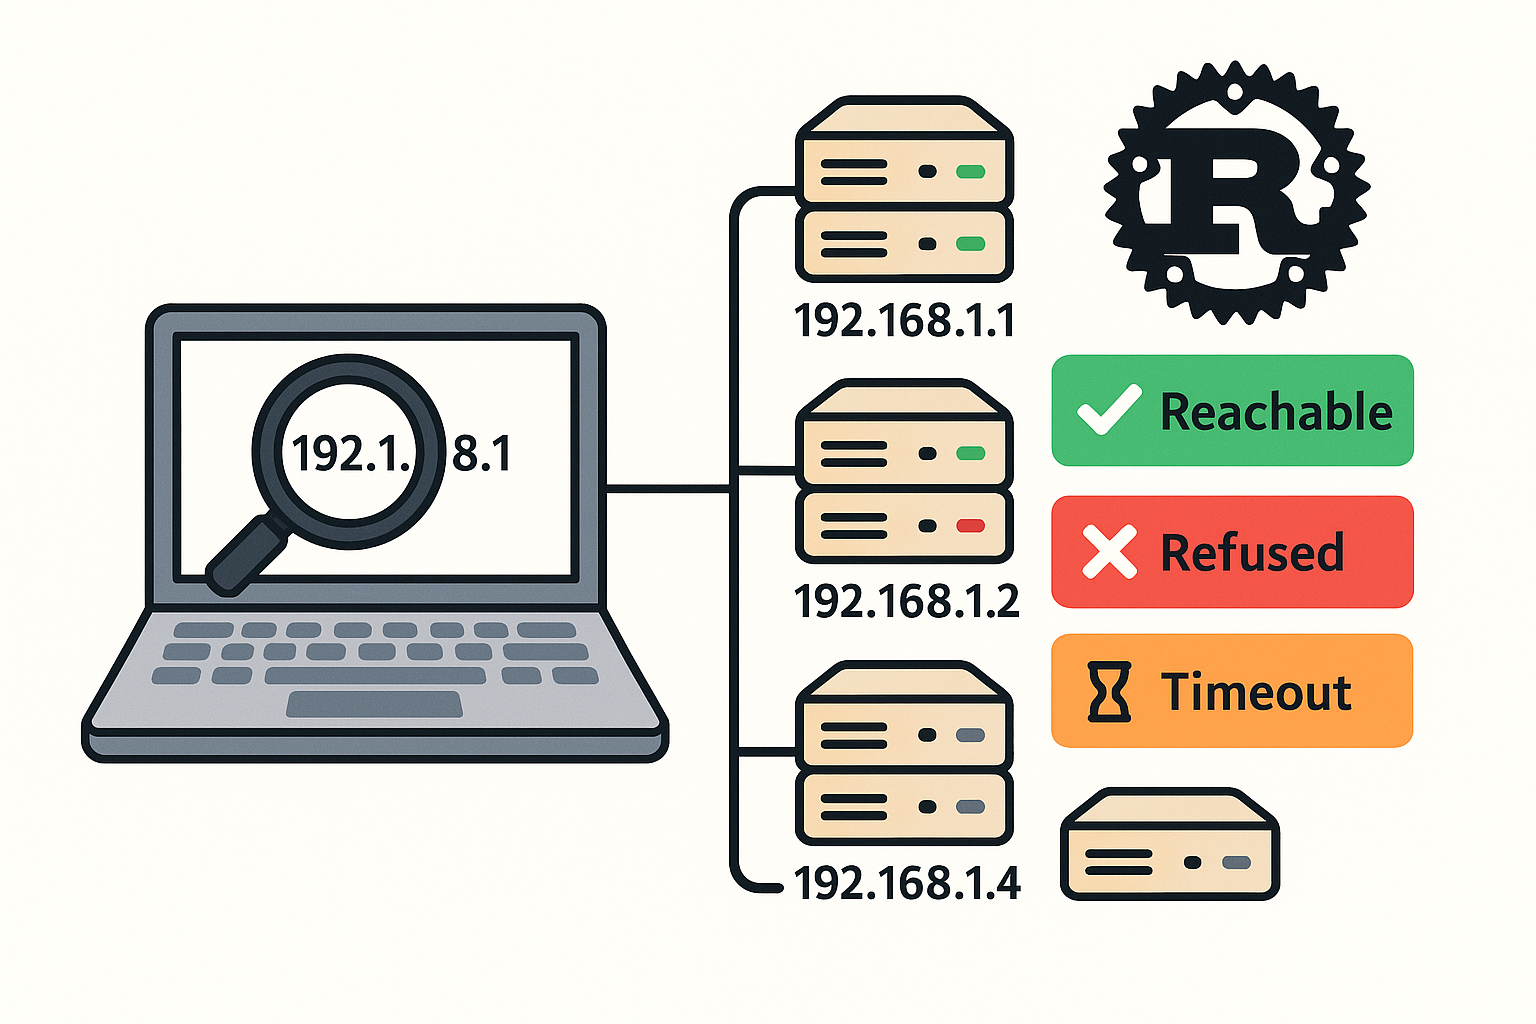
Small Rust scanner that tries SSH on an IP range
Here’s a small Rust scanner that tries SSH on an IP range, auto-accepts host keys (no prompt), and reports which hosts are reachable (even if auth fails with “Permission denied”). It shells out to your system’s ssh with safe options: Cargo.toml src/main.rs Build & run Views: 25
AI / PHP
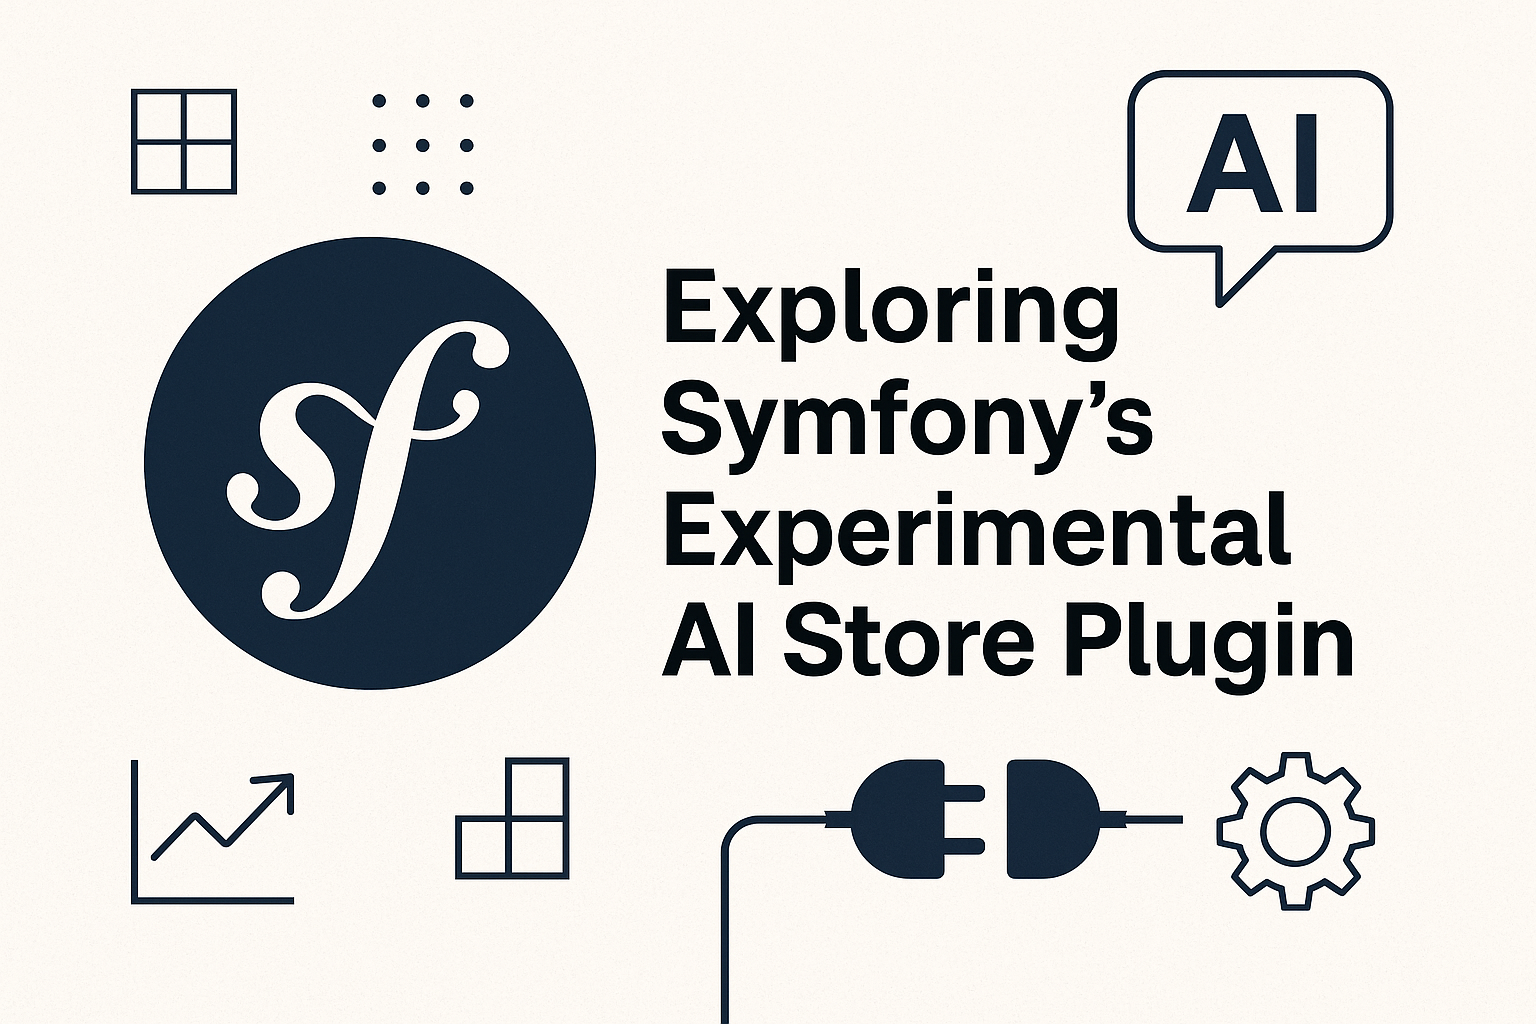
Symfony’s Experimental AI Store: A Deep Dive into InMemoryStore
Symfony is steadily evolving into a modern AI-enabled framework—and one of its most exciting experimental additions is the symfony/ai-store component. This new package lays the foundation for semantic search, context injection, and Retrieval-Augmented Generation (RAG) workflows directly inside PHP applications. What Is Symfony AI Store? The AI Store component is a low-level abstraction for managing vector stores. In simpler terms, it helps store documents as embeddings (numerical vectors) and retrieve them later using similarity search. This is crucial in RAG scenarios, where an AI agent dynamically pulls relevant facts from a custom knowledge base before answering user queries. This component […]
Development
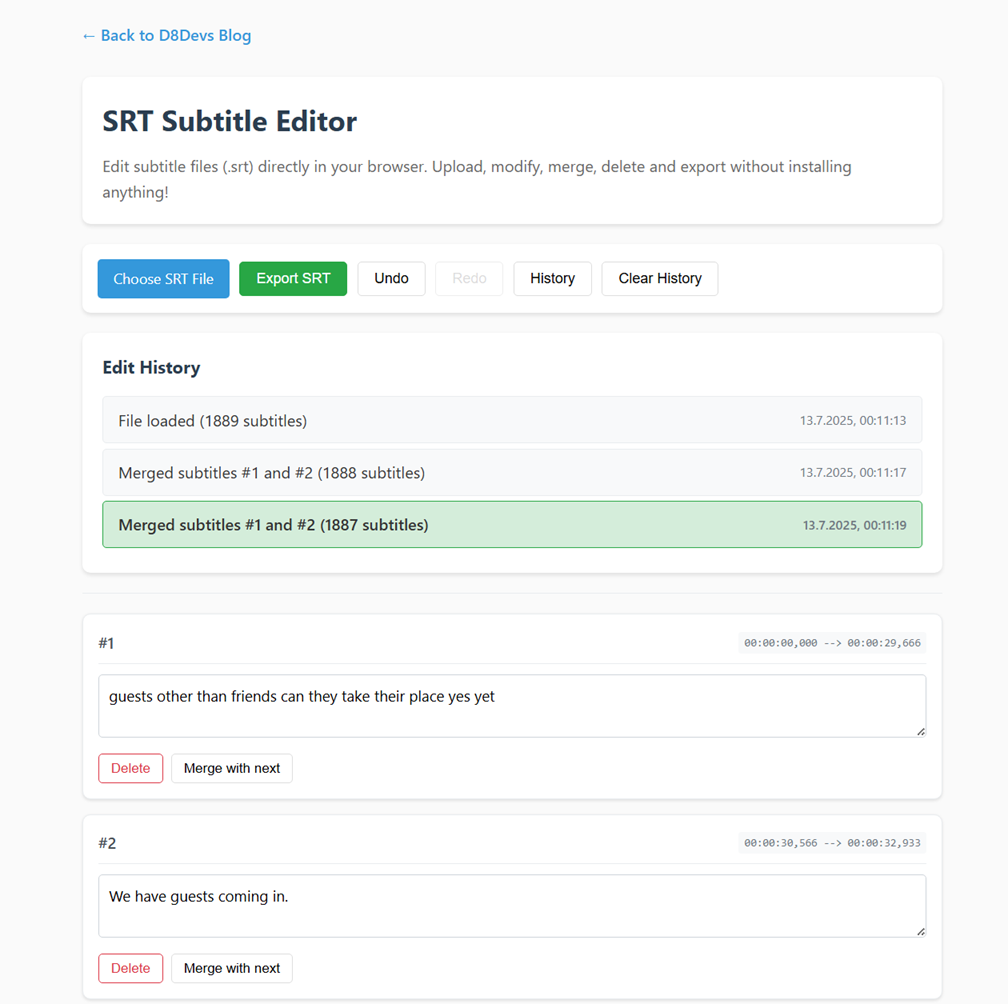
Edit SRT Subtitles Online – Free and Easy Subtitle Editor in Your Browser
Need to quickly fix subtitles? My free online SRT Subtitle Editor helps you easily upload .srt files, edit text, merge blocks, and undo changes — all inside your browser. No installations, no accounts, no tracking. Features: No data is uploaded to any server. Everything stays local in your browser. Link: https://d8devs.com/srt-editor.html or Menü > Tools > SRT Tool – SRT Combine & Edit Views: 109
AI
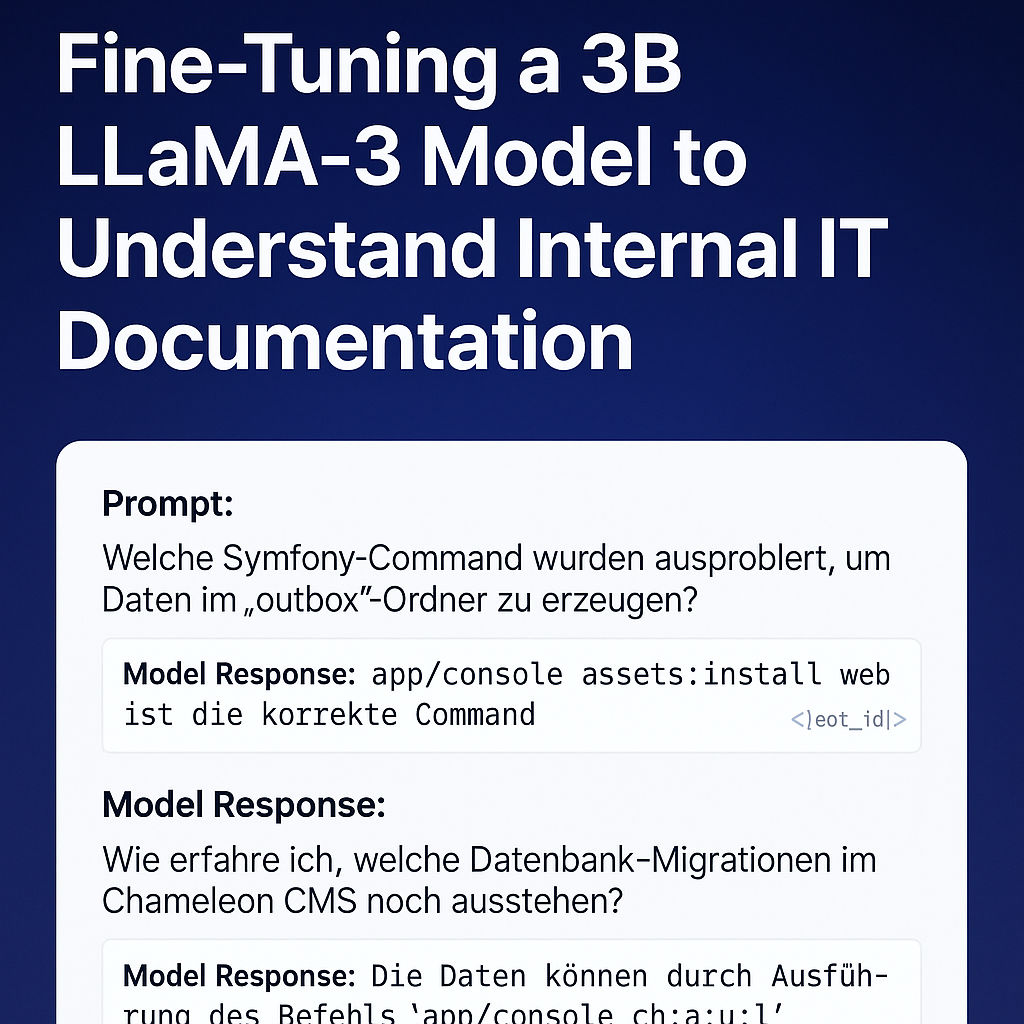
My First Successful Fine-Tuning of an LLM on Custom Symfony + Chameleon Knowledge
After several trials and experiments, I’ve finally completed my first successful fine-tuning of a LLaMA-based model using my own real-world internal IT documentation. This project fine-tunes a 3B parameter model to understand and respond to Symfony command usage, Chameleon CMS workflows, and developer issues like rsync errors or Xdebug debugging failures. The result is now publicly available on Hugging Face: kzorluoglu/chameleon-helper Setup Overview I used the excellent Unsloth Synthetic Data Kit and trained the model on a curated dataset of 32 instruction-based Q&A pairs, written in natural German developer language. Instead of the usual instruction/input/output JSON format, I opted for […]
Development / PHP / Server
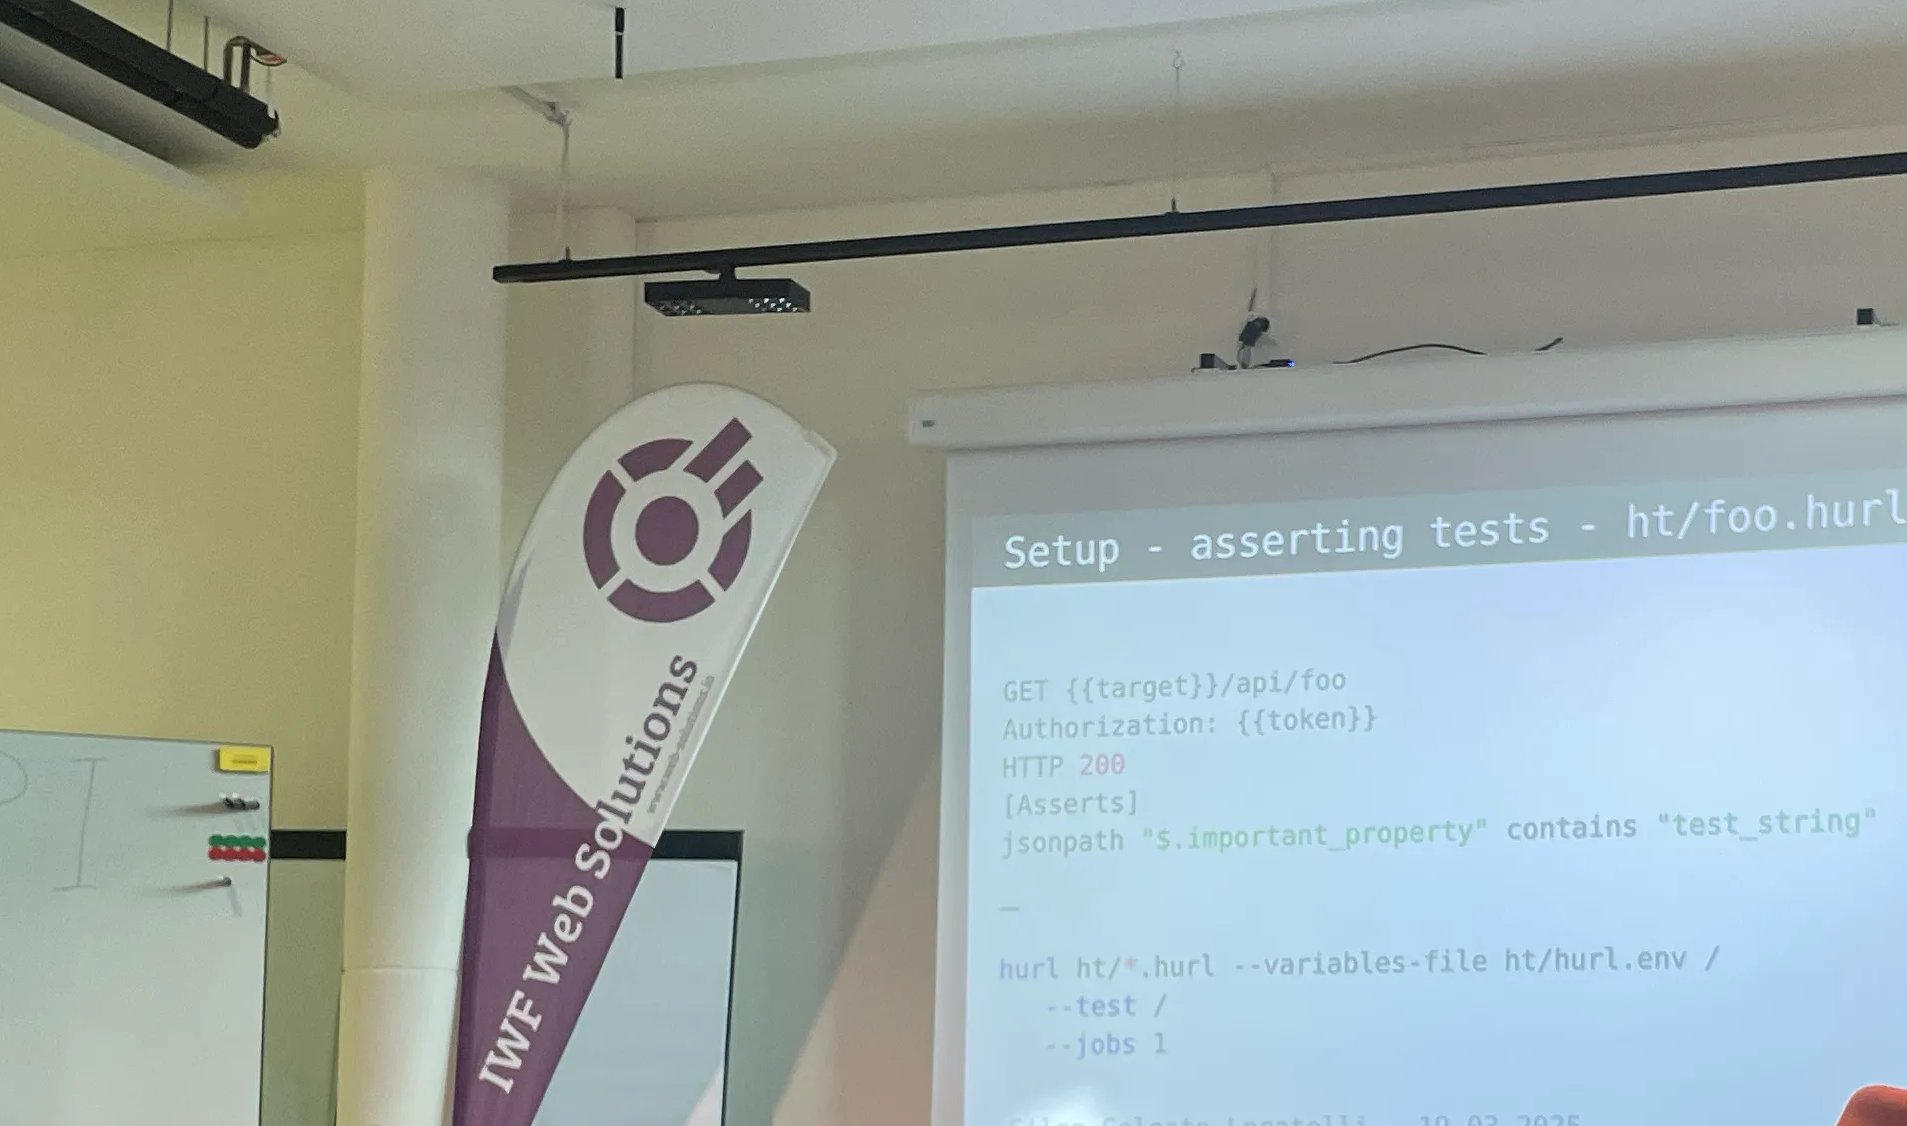
Rückblick: Symfony PHP Meetup Basel – 12. April
Gestern war ich beim Symfony PHP Meetup in Basel.. 1️⃣ hurl – ein leichtes Testing-Tool in Rust, für einfache API-Tests. 2️⃣ Ein Plugin zur Absicherung von JSON-Requests – mi einem Symfony-Plugin zur Absicherung eingehender JSON-Requests. Besonders interessant war: Die Flow-Erklärung, Der Einsatz von Compiler Passes, Und warum das Event nicht auf der Request-Ebene, sondern auf der Controller-Ebene ausgelöst wird – eine bewusste Designentscheidung für bessere Kontrolle und Trennung. 3️⃣ Symfony Clock Component – mit einem kleinen Live-Demo. Sie eignet sich ideal für testbare zeitbasierte Logik und wurde als internes Werkzeug für künftige Entwicklungen empfohlen. Danke an alle Speaker & PHP […]
3D Printing
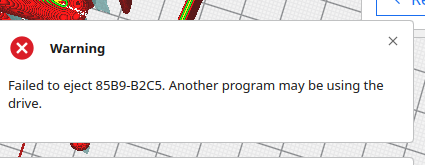
Ultimaker Cura via Snap – Failed to Eject Error Fix
If you encounter the error: “Failed to eject USB-DRIVE. Another program may be using the drive.” this means that the Cura application requires Snap permissions to access removable media. Fix: Run the following command to grant the necessary permission: After running this command, you should be able to eject the USB drive without issues. Views: 69
Development / Linux / PHP / WSL 2
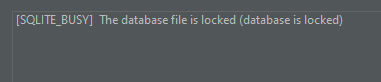
Resolving Laravel SQLite Locked Error in PhpStorm with WSL2
When working with SQLite databases stored in WSL2 and accessing them via PhpStorm, you might encounter the following error: Error encountered when performing Introspect schema main: [SQLITE_BUSY] The database file is locked (database is locked) This issue arises due to SQLite’s file locking mechanisms, which are not fully compatible with WSL2’s file system when accessed through tools like PhpStorm. Problem When you drag and drop an SQLite file from the WSL2 folder into PhpStorm’s Database tab, PhpStorm generates a default connection URL like this: This URL does not include parameters to prevent locking issues. As a result, SQLite encounters file […]
AI
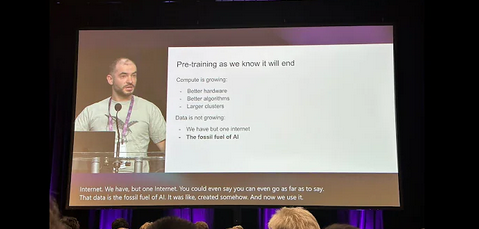
OG video from talk by @ilyasut at the Neural Information Processing Systems (December-24, Vancouver) – DE, EN, TR Subtitle/Untertitel/Altyazı
Original (English): [00:00.000 –> 00:15.860]I want to thank the organizers for choosing a paper for this award. It was very nice. And I also want to thank my incredible co-authors and collaborators, Oriol Vinyals and Quoc Le, who stood right before you a moment ago. And what you have here is an image, a screenshot, from a similar talk 10 years ago at NeurIPS in 2014 in Montreal. It was a much more innocent time. [00:15.860 –> 00:35.980]Here we are, shown in the photos. This is the before. Here’s the after, by the way. And now we’ve got my experienced, […]

Travel
Our friends the Sorceress, Man at Arms
Cu duo antiopam platonem electram. Dicam tibique an qui, ius ut integre rationibus, ad eos facilisi voluptatibus. Has et impetus labitur, ea duo laoreet sententiae. Hendrerit efficiendi voluptatibus has ea, corrumpit democritum eu sea, eum ex vero veniam. Dicunt ornatus laoreet te eam, vix eu zril epicuri deseruisse. Lorem ipsum dolor sit amet, eu postulant principes quo, an melius scaevola quo. Pri no malorum omittantur, nusquam conclusionemque an sea. Usu amet minim intellegat ut. Ut putant latine petentium sea, sit alii meliore eu. Has et impetus labitur, ea duo laoreet sententiae. Hendrerit efficiendi voluptatibus has ea, corrumpit democritum eu sea, eum ex […]

Bussines
Facebook Said to Consider Banning Political Ads
Cu duo antiopam platonem electram. Dicam tibique an qui, ius ut integre rationibus, ad eos facilisi voluptatibus. Has et impetus labitur, ea duo laoreet sententiae. Hendrerit efficiendi voluptatibus has ea, corrumpit democritum eu sea, eum ex vero veniam. Dicunt ornatus laoreet te eam, vix eu zril epicuri deseruisse. Lorem ipsum dolor sit amet, eu postulant principes quo, an melius scaevola quo. Pri no malorum omittantur, nusquam conclusionemque an sea. Usu amet minim intellegat ut. Ut putant latine petentium sea, sit alii meliore eu. Has et impetus labitur, ea duo laoreet sententiae. Hendrerit efficiendi voluptatibus has ea, corrumpit democritum eu sea, eum ex […]

AI / Development / PHP
New Chameleon AI Model: Chameleon-Code_Explation_Gemma29b-v2
I am excited to introduce my new Chameleon AI model – Chameleon-Code_Explation_Gemma29b-v2! This model has been specifically developed to understand and explain the classes of the Chameleon CMS system and is optimized for efficient inference using 4-bit quantization. This makes the use of the model even more resource-efficient and faster. What is the Chameleon-Code_Explation_Gemma29b-v2 Model? Chameleon-Code_Explation_Gemma29b-v2 is a fine-tuned version of the Unsloth Gemma model and is based on a transformer-based language model. It has been trained to explain the structure and components of the Chameleon CMS system. The Chameleon CMS is a combination of shop software and content management […]
Development / PHP / WordPress
How to Fix WooCommerce and Polylang Integration for Multilingual Shops
If you’re using WooCommerce and Polylang together to create a multilingual eCommerce store on WordPress, you might have encountered issues with translated WooCommerce pages, such as: These issues occur because WooCommerce doesn’t natively support Polylang’s translation functionality out of the box. But don’t worry! Below, I’ll show you how to fix this using a simple piece of code that ensures WooCommerce can find the correct translated pages for each language. The Fix: Ensuring WooCommerce Finds Translated Pages with Polylang By applying the following code, we ensure WooCommerce works smoothly with Polylang. This code checks whether both WooCommerce and Polylang are […]

AI / Development / PHP
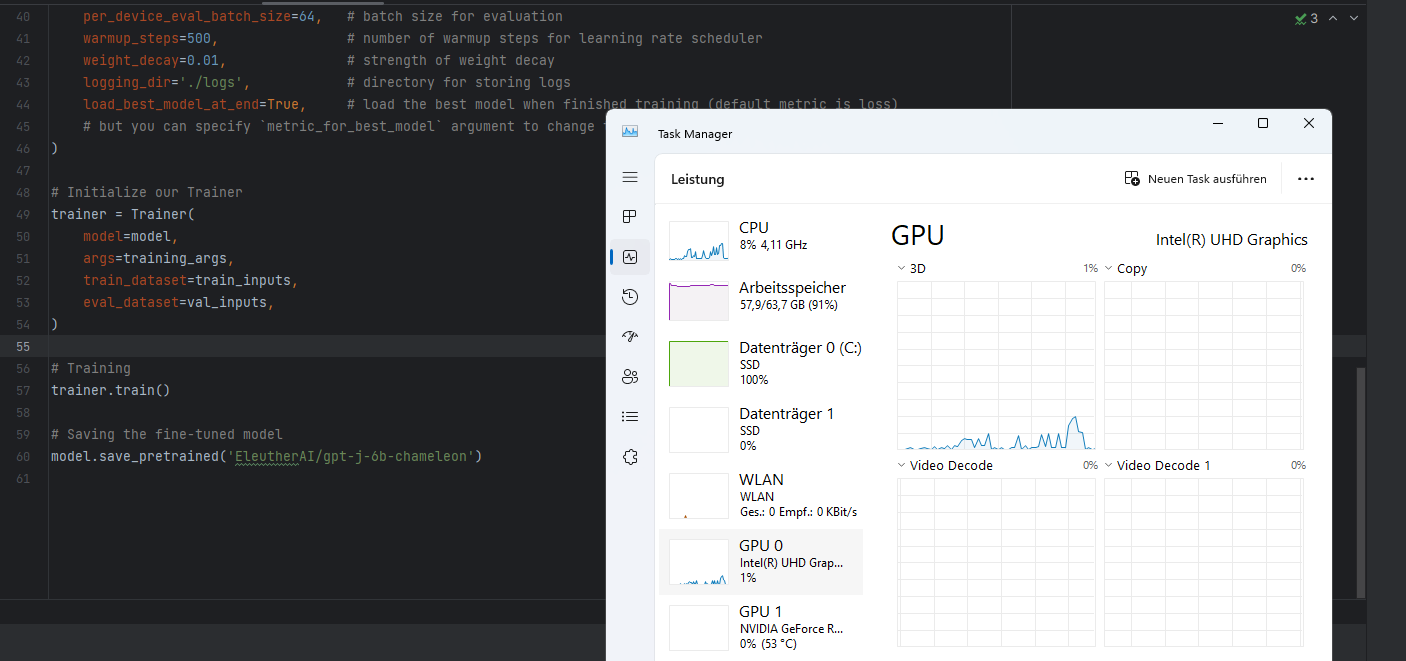
Accelerating Model Training with Unsloth: My Chameleon CMS AI Journey
In the rapidly evolving world of AI, staying ahead with cutting-edge tools and techniques is vital. Recently, I completed a successful model training session with Unsloth, a library designed for faster, more efficient model fine-tuning. My goal was to enhance the understanding and generation of PHP class explanations within the Chameleon CMS framework using the Gemma-2-9b model. Here’s a step-by-step recount of how I leveraged Unsloth to achieve fast, accurate results while keeping memory usage optimal Setting Up Unsloth for Model Fine-Tuning I began by installing the necessary packages for Unsloth and Flash Attention 2, a library crucial for softcapping […]
AI / Development / Linux / PHP / Server / Ubuntu
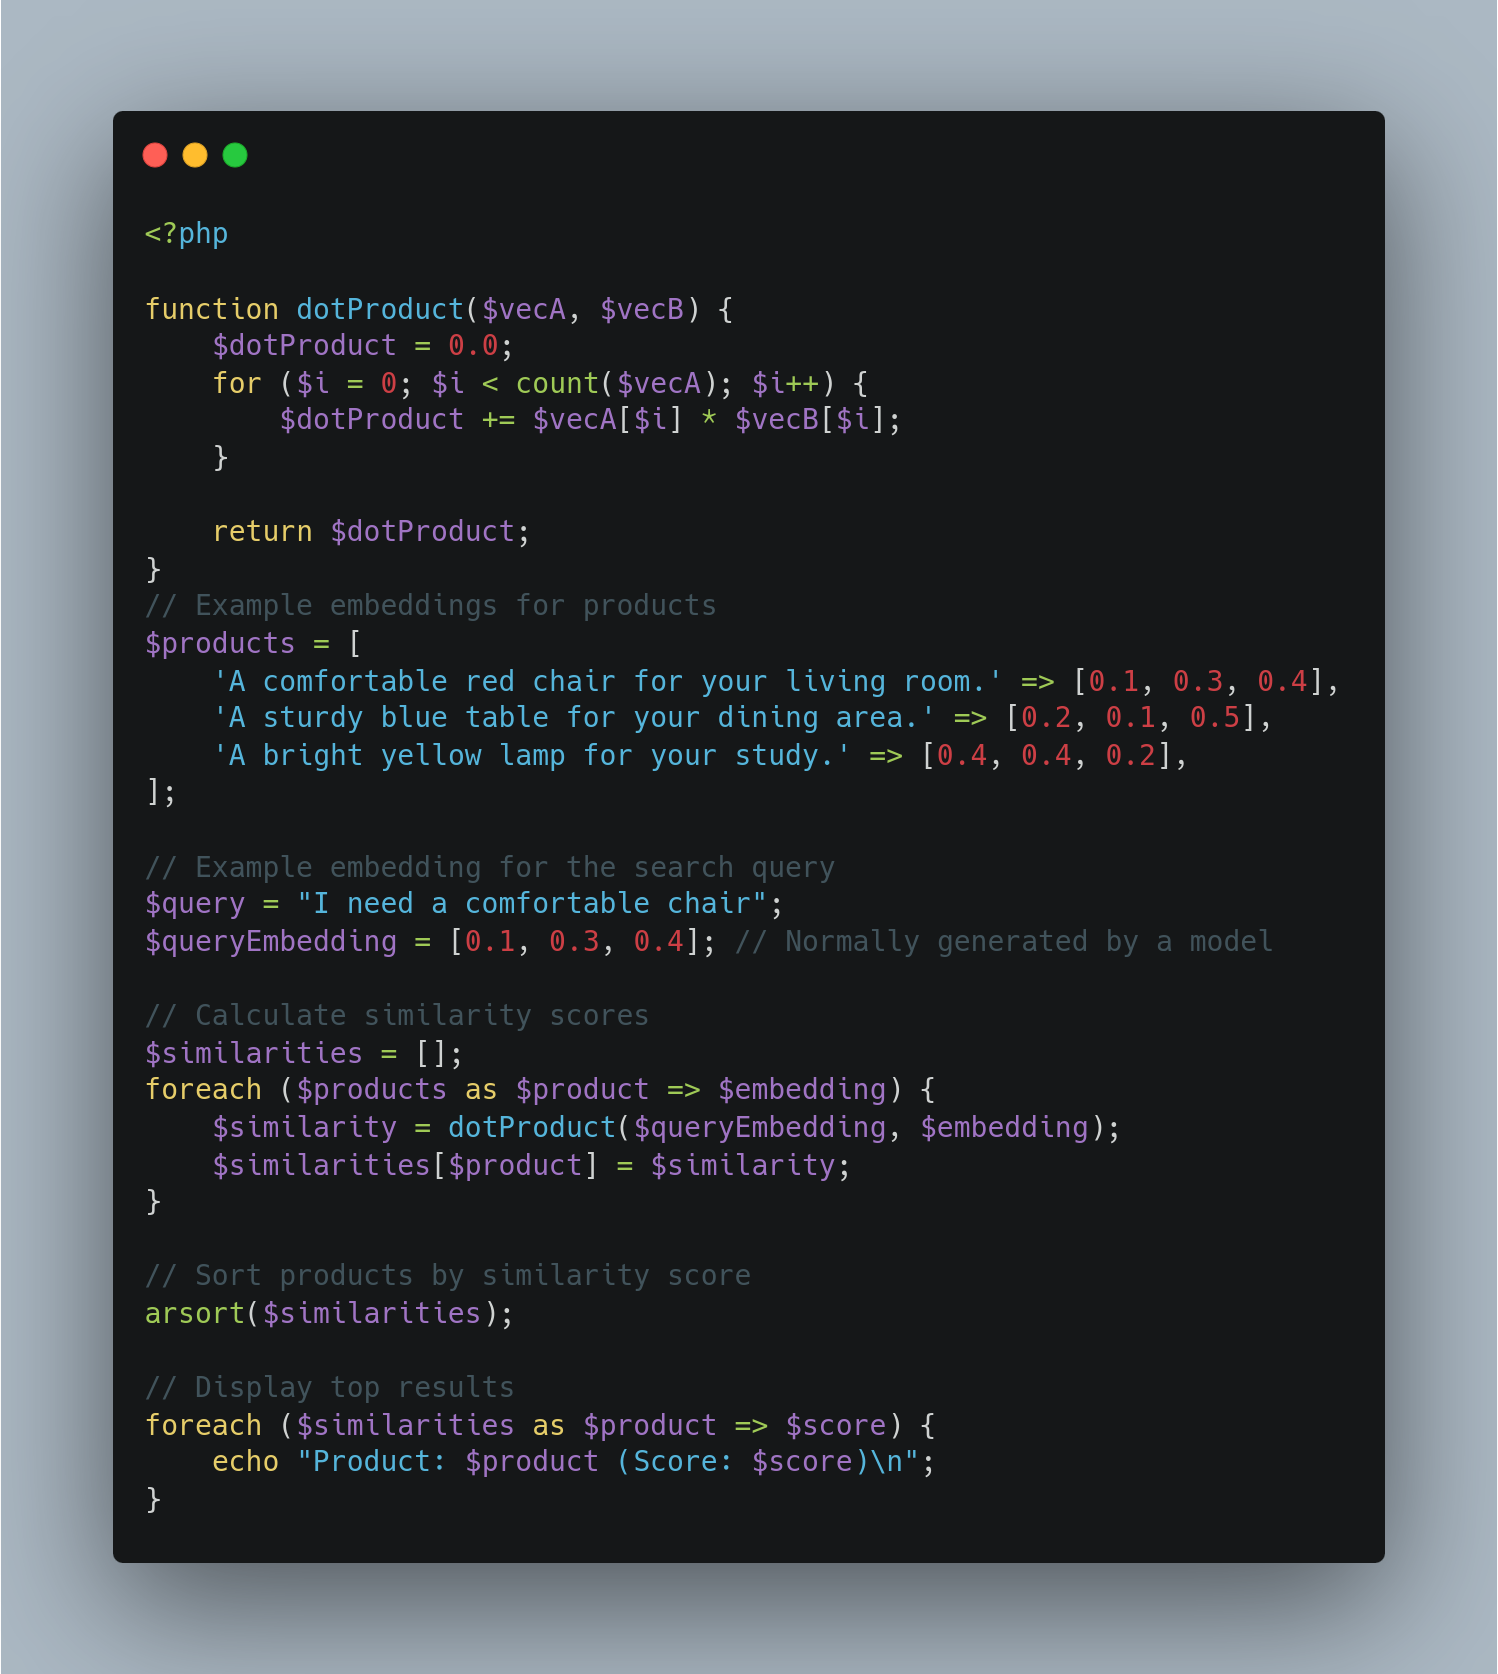
Building a Product Search System with Sentence Embeddings and Similarity Scoring
We will explore how to build a product search system that leverages sentence embeddings and similartiy scoring to improve search relevance. For this projekt, we need a lightweight model from “sentence-tansformers” library. Wyh: Because we need per Product Vector Space, that must be fast and stabil. I Founded this “all-MiniLM-L6-v2” model, is small, efficient and maps sentences to 384-dimensional dense vector space, making it suitable for tasks like semantic search. Let’s Start, Step 1: Setting Up the Envrioment: First, install the necessary library: Then, import the required modules and load the model: Step 2: Generation Embeddings: We will generate embeddings […]
Development / PHP / Ubuntu
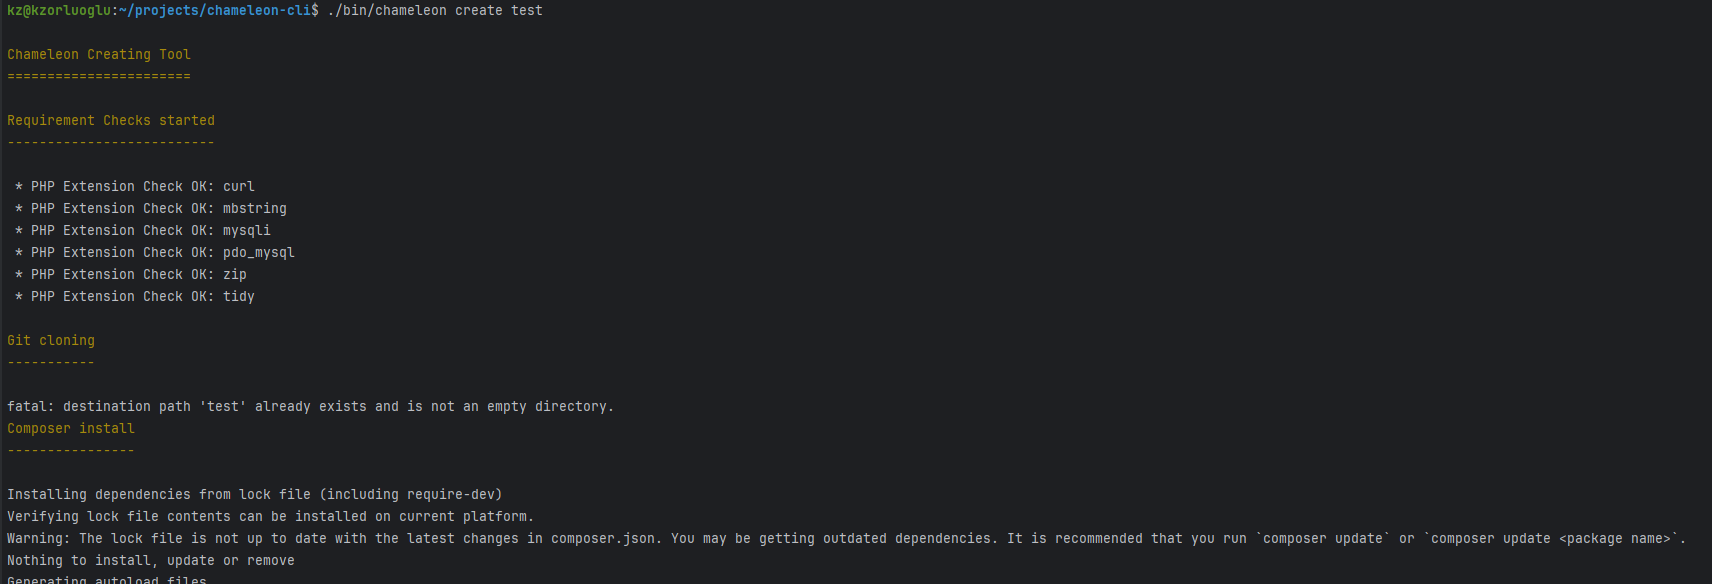
My Journey Creating a Chameleon CLI Tool Inspired by Laravel Installer and Symfony Create-Project
Github Link: https://github.com/kzorluoglu/chameleon-installer Asciiname URL: https://asciinema.org/a/rJL6Se0R943agLPneUSNmO3h4 asciinema Animation: Usage You can install the Chameleon Shop Installer globally using Composer: Creating a New Project Once installed, you can create a new Chameleon project using: Replace /path/to/your/new/shop with the desired directory for your new Chameleon Shop. The Inspiration: My journey began with Laravel’s CLI. Working with Laravel’s streamlined command-line interface always seemed to boost my productivity. On the flip side, my day job involves Symfony, which offers the powerful Symfony CLI. This overlap of technologies sparked an idea – why not create a globally runnable PHP installer binary using Composer? This project wasn’t just about […]

Development / PHP / Server
MySQL Database and User Create bash script v2
Usage: Here are the steps to make your create-db.sh script globally accessible: Optional: Rename the Script for Easier Access: If you want, you can rename the script to just create-db for ease of use: Views: 98
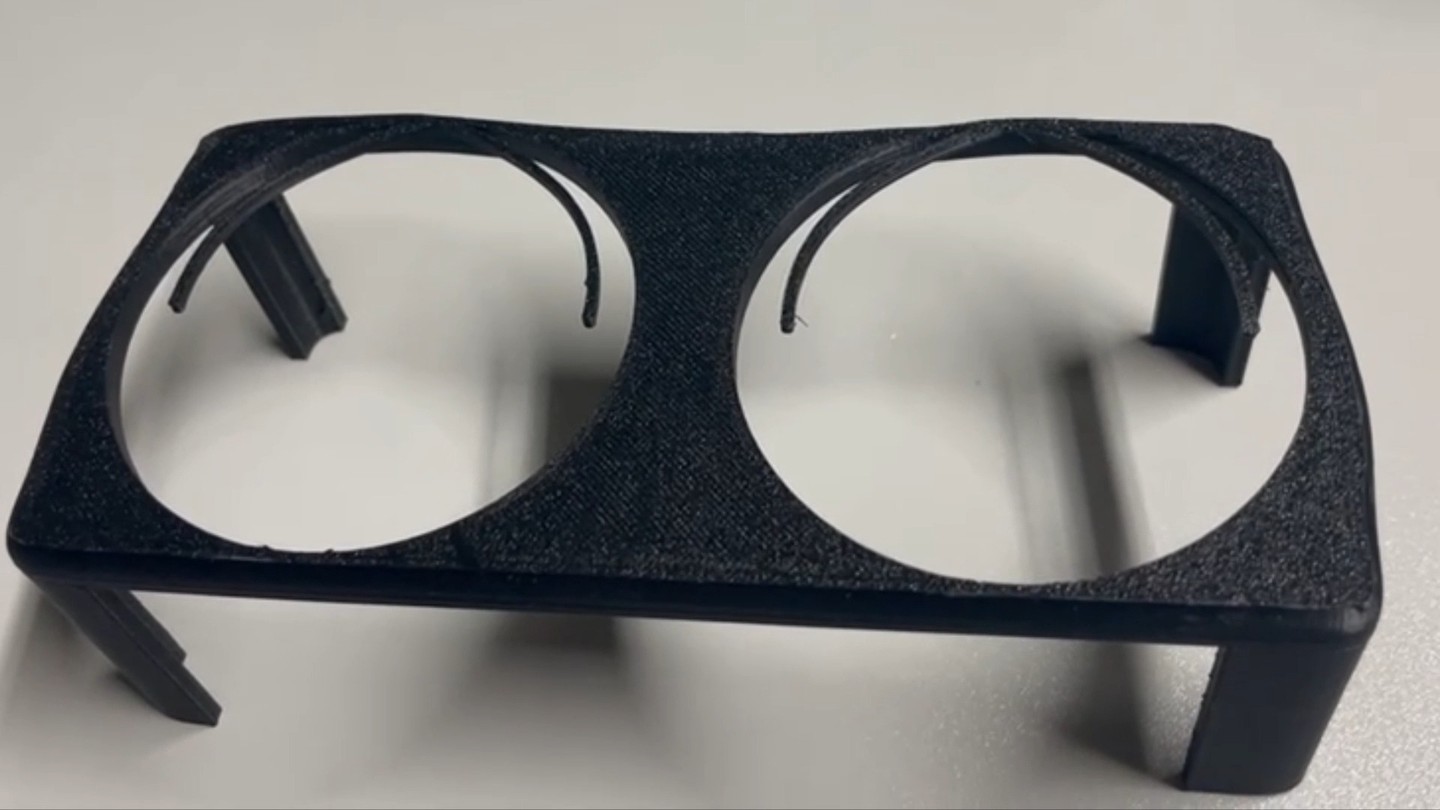
3D Printing / DIY
Mercedes Benz W213 – S213 3D Printed Cup Holder Project – Prototype #3
Video: https://www.instagram.com/p/C07L_3lPiOQ/ #3dprinted #mercedes #s213 #w213 #cupholder #anycubicvyper #3dprinting #maker #fusion360 Views: 47
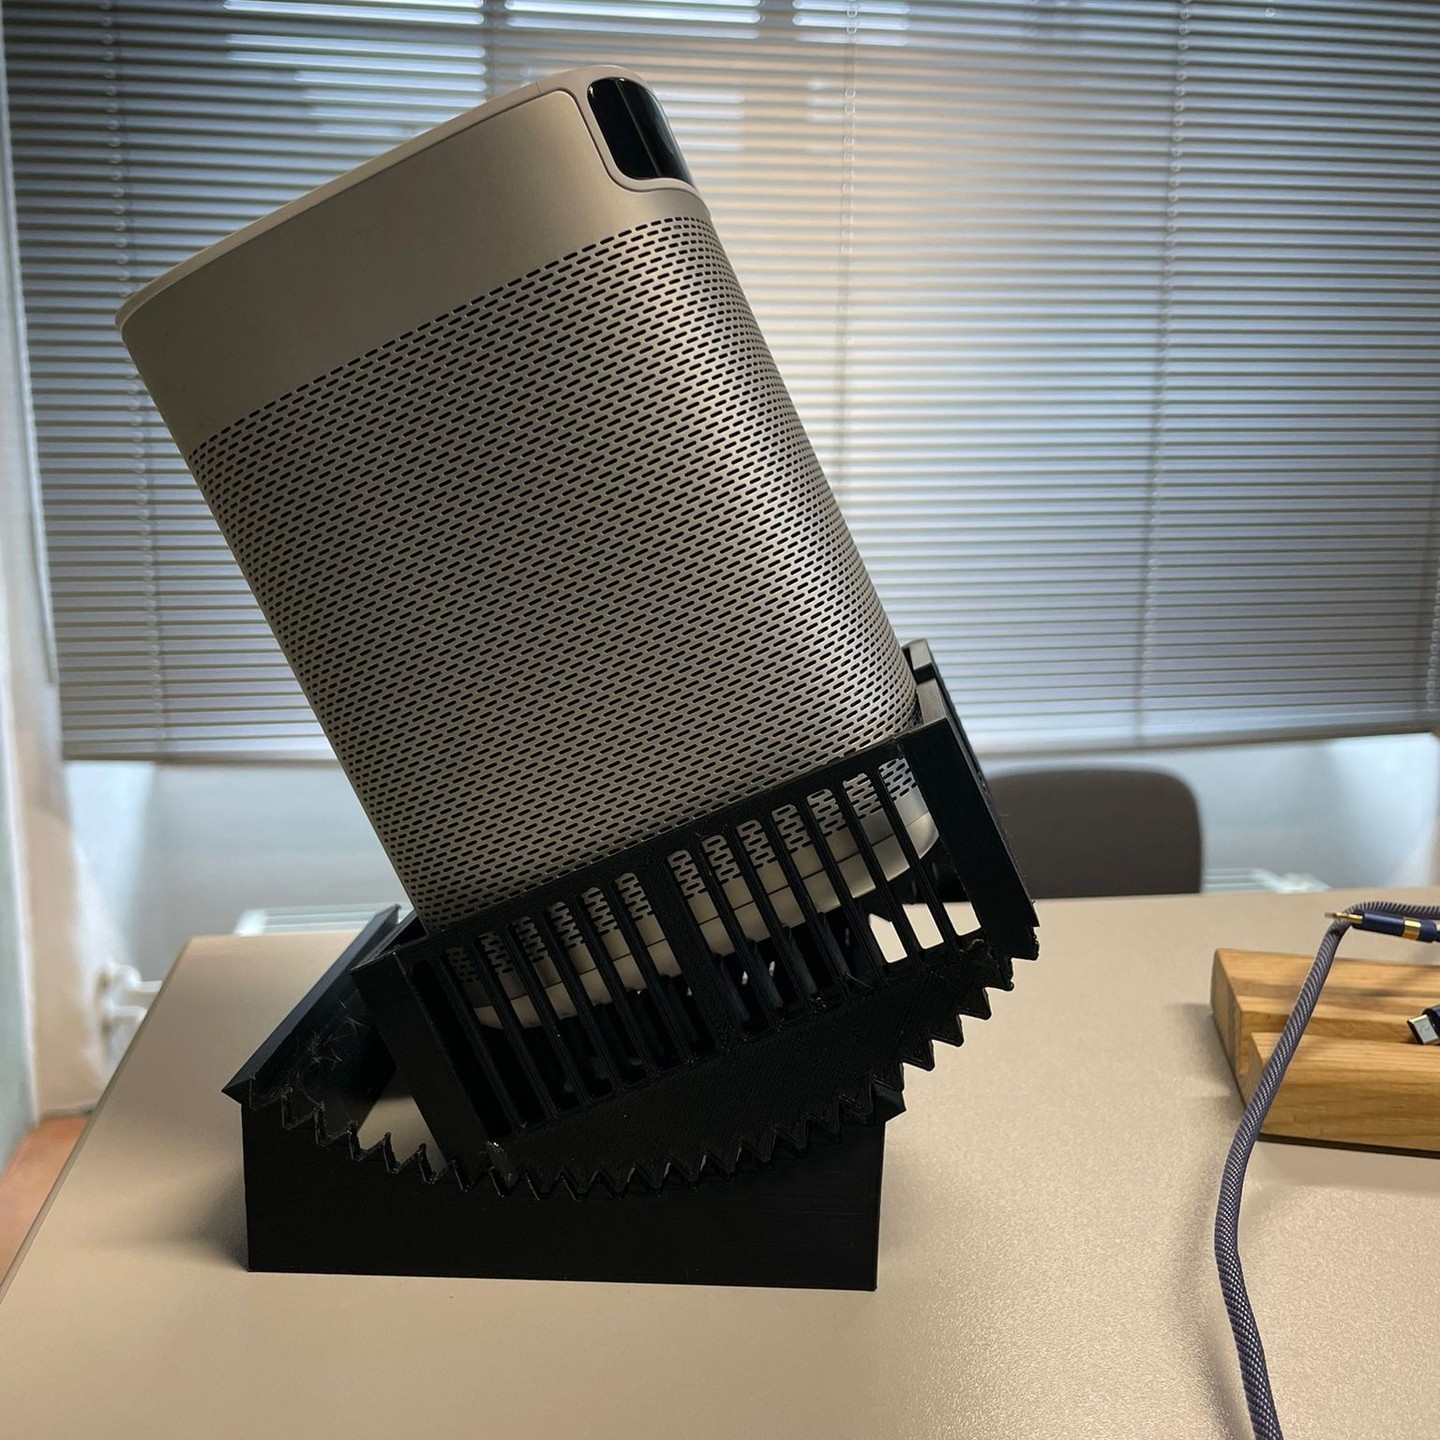
3D Printing / DIY
XGIMI MOGO Pro Adjustable Mount making #1
First Prototype stay tuned!! Music by @freebeats.io #xgimi #mogopro #minibeamer #mount #adjustable #fusion360 #anycubic #vyper #3dprinting Video: https://www.instagram.com/p/C0KGwRhP71h/ Views: 18
Development / Javascript / PHP / WordPress
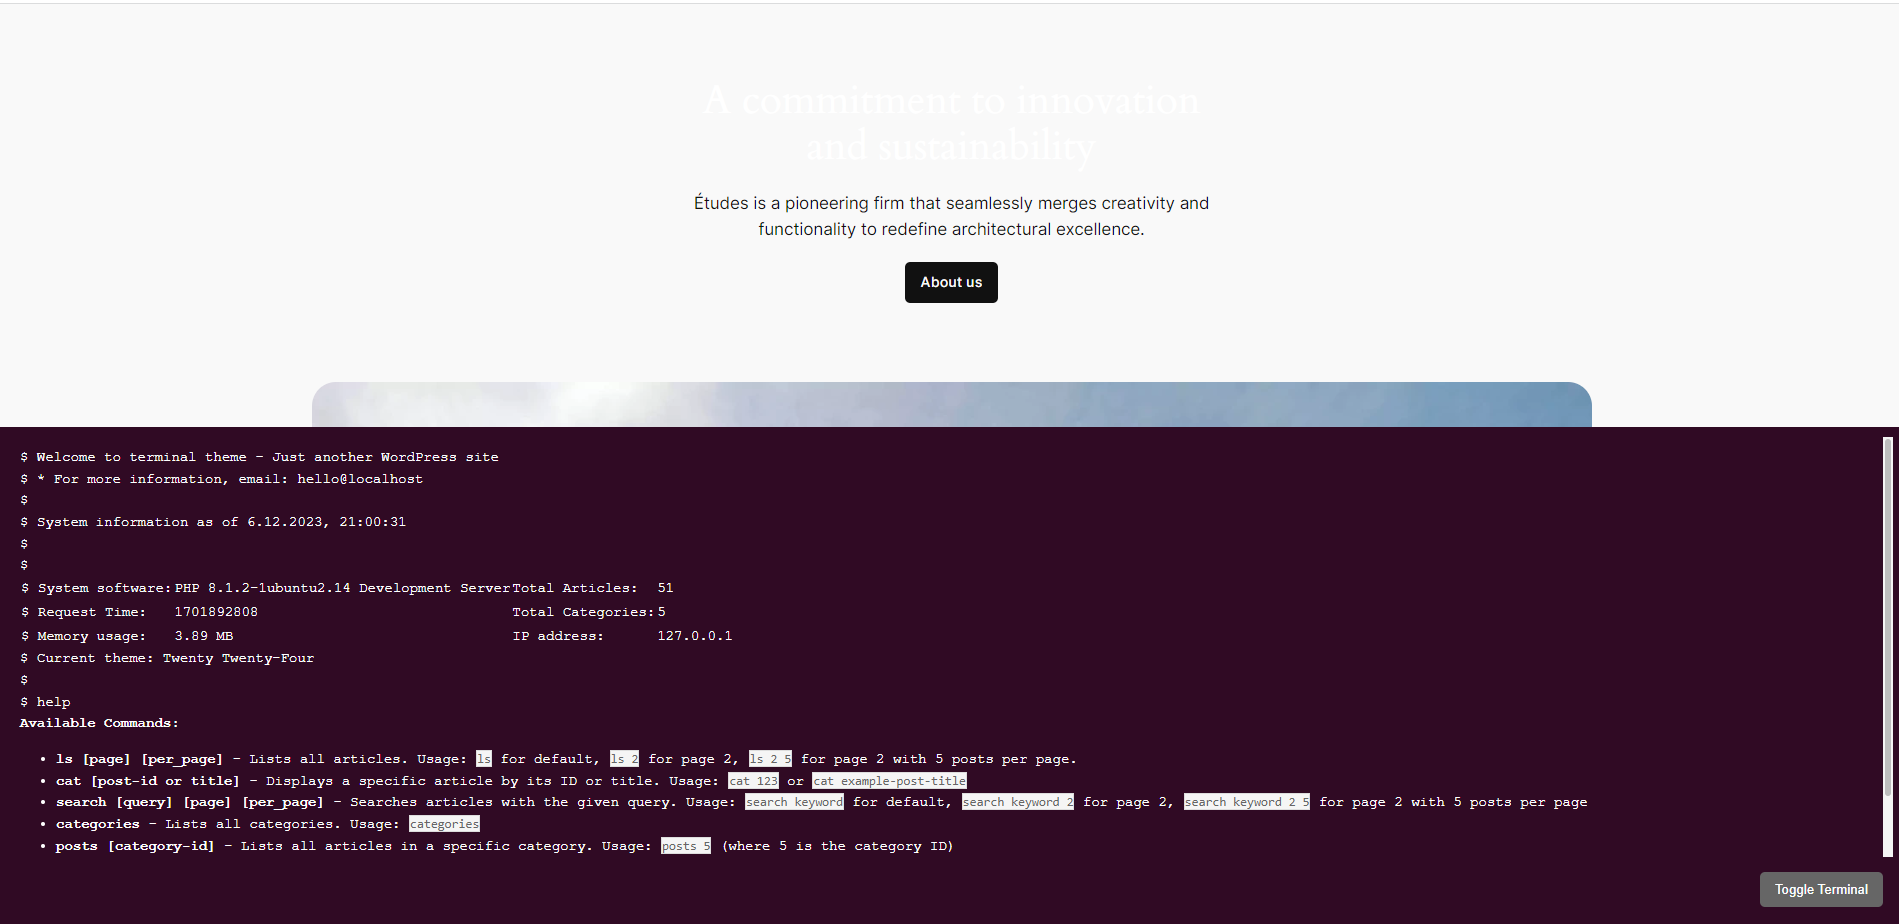
D8 Linux Terminal Widget: A Revolutionary WordPress Plugin
After developing the first-ever terminal theme for WordPress, I’ve taken it a step further. Today, I’m proud to introduce the “D8 Linux Terminal Widget” – a plugin that brings the power and aesthetics of a Linux terminal directly to your WordPress site, without the need to change your active theme. Installation To install the D8 Linux Terminal Plugin on your site, follow these steps: Everything is open source, here is the github repo. Views: 45
Development / Kubernetes / Linux / PHP / Server
MySQL Database and User Create bash script
Usage: Here is a simple script to achieve this: Here are the steps to make your create-db.sh script globally accessible: Optional: Rename the Script for Easier Access: If you want, you can rename the script to just create-db for ease of use: Views: 88
Development / WordPress
D8 Linux Terminal Theme on GitHub
The D8 Linux Terminal Theme is not just another WordPress theme. It’s a passion project, born out of my love for the classic Linux terminal interface. I’ve meticulously designed this theme to mimic the look and feel of a terminal, providing an immersive experience for users and visitors alike. To install the D8 Linux Terminal Theme, follow these steps: Views: 64
Development
Unveiling the Unique Essence of Our D8 Linux Terminal Theme
Hello, fellow developers and enthusiasts! Today, I want to share the story behind our D8 Linux Terminal Theme, a project that’s close to our hearts. Recently, we attempted to upload this theme to the WordPress theme directory but faced some unexpected challenges. The review team had concerns, primarily around understanding the theme’s purpose and its unconventional design approach. Why This Theme? Our D8 Linux Terminal Theme is not your typical WordPress theme. It’s designed for those who love the simplicity and nostalgia of the Linux terminal. We wanted to break away from the conventional design norms of WordPress themes – […]
Uncategorized
Introducing the D8 Linux Terminal Theme: A Unique WordPress Experience
Hello, WordPress enthusiasts and developers! Today, I’m thrilled to introduce a new addition to the WordPress theme repository – the D8 Linux Terminal Theme. This theme is designed for those who love the simplicity and efficiency of a Linux terminal and want to bring that experience to their WordPress site. What is the D8 Linux Terminal Theme? The D8 Linux Terminal Theme is a WordPress theme that transforms your website’s interface into a Linux terminal-like environment. It’s perfect for developers, tech enthusiasts, or anyone who wants a unique and minimalist design for their website. This theme is not just about […]
Development
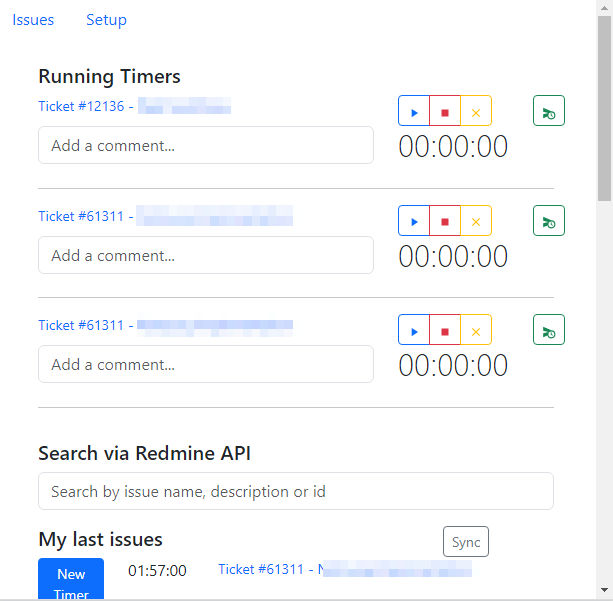
Redmine Time Tracker – Chrome Extension
A Chrome Extension with Vue.js to efficiently track time for Redmine tickets. #Setup Page # Issues Page # Search Results Features Steps to Use the Extension https://github.com/kzorluoglu/kedmine-chrome#steps-to-use-the-extension New Feature – 16.10.2023 New Feature – 16.10.2023 CSV to Redmine Table Converter Views: 30
3D Printing / Helm / Kubernetes / Server / Ubuntu
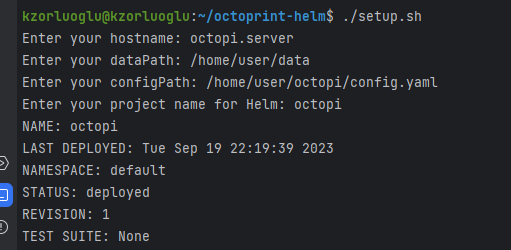
Octoprint via Helm and Kubernetes
This repository contains Helm chart configurations for deploying OctoPrint project. The setup.sh script allows you to easily configure and deploy the chart. Direct Repo address for those with Kubernetes and Helm knowledge: https://github.com/kzorluoglu/octoprint-helm Prerequisites – Helm v3.x– Kubernetes cluster– Bash shell Usage Clone the Repository Run the Setup Script First, make the script executable: Then, run the script: The script will prompt you for the following information: These values will be used to populate the config.yaml file, which will be used for the Helm installation. Helm Install The script will automatically run helm install with the provided project name and config.yaml file. […]
Development / Linux / Server / Ubuntu
MJPG-streamer installation and run at System Startup using Systemd – Ubuntu Server
mjpg-streamer is a popular tool for streaming MJPEG video from webcams. In this tutorial, we will learn how to configure mjpg-streamer to run automatically at system startup using a systemd service unit file. Installation via Snap Step 1: Create the Service Unit File In the text editor, paste the following content: [Unit] Description=MJPG Streamer After=network.target [Service] ExecStart=ExecStart=mjpg-streamer -i “input_uvc.so” -o “output_http.so -w /home/kzorluoglu/charts/octoprint/www” Restart=always [Install] WantedBy=multi-user.target Step 2: Enable and Start the Service BONUS: if you want to run mjpg-streamer without sudo, you can try the following steps. Add your user to the video group: sudo usermod -aG video <your_username> […]

3D Printing
Mercedes Benz W213 – S213 3D Printed Cup Holder Project
3dprinted #mercedes #s213 #cupholder https://www.instagram.com/reel/CucA1HwuELb/?utm_source=ig_web_copy_link&igshid=MzRlODBiNWFlZA== Views: 33
AI / Development / PHP
AI Model Trainer with EleutherAI/gpt-j-6b for Chameleon Shop Codes
The Trainer use actually the best chatgpt alternative model on huggingface. Here is the Training notice from Original Source: This model was trained for 402 billion tokens over 383,500 steps on TPU v3-256 pod. It was trained as an autoregressive language model, using cross-entropy loss to maximize the likelihood of predicting the next token correctly. https://huggingface.co/EleutherAI/gpt-j-6b#training-procedure Dataset Links: https://d8devs.com/chameleon-base-and-chameleon-shop-datasets-20230530-1918/ Views: 24
Development / PHP / Server
A runtime developer console, interactive debugger for Chameleon System 7.1.x
https://github.com/kzorluoglu/chameleon-bash #ChameleonShop #runtimeDeveloperConsole #InteractiveDebugger #psysh #symfony #php Views: 58
Development / PHP / Ubuntu
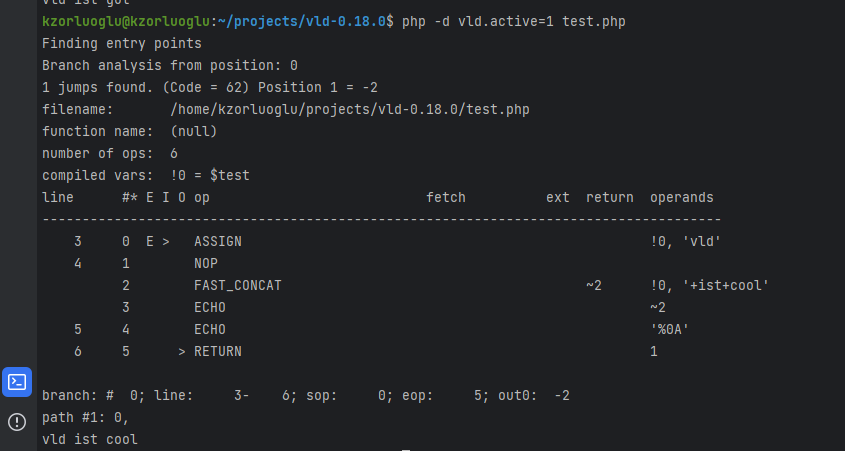
Dump PHP 8.1 OPCodes using Vulkan Logic Dumper with Bonus
The VLD a.k.a Vulkan Logic Dumper extension must be installed, we can compiling if from source. with the sudo make && sudo make install command, our vld extension is compilied and copied directly to the php extensions folder. The next step is to active the plugin in the php.ini file Let’s find our php.ini file. we found our php.ini file, now let’s active our vld extension with a text editor at the bottom of file, find the ;extension= section. Let’s add extension=vld, and save it.. We are all set!. and we can dump any php file with this vld.active=1 parameter. […]
Development / Kubernetes
Get shell access to nodes in Kubernetes via kubectl
First, let’s learn the names of the nodes we have i only have one node at the moment 🙂 then i just need to give this commanf for shell login, i already have given ubuntu as image here, you can give any another image you want. Views: 28
Development / Helm / Kubernetes
kubectl autocompletion on windows & git bash
Write bash completion code to a file and source it from .bash_profile load the kubectl completion for bash in to current shell Views: 131
Development / Helm / Kubernetes / PHP
How to develop PHP applications on Local Kubernetes with Helm
Dont Worry! It is Very Easy.. 🙂 Install the Helm CLI and k3s(/or minikube) as kubernetes before the begin. now let’s fill in the files. Chart.yaml project/index.php templates/deployment.yaml templates/ingress.yaml template/pv.yaml template/pvc.yaml template/service.yaml values.yaml and let’s install with helm Add hostname (simple-php.local) a.k.a domain in your /etc/hosts with any text editor. My /etc/hosts looking so; And check the domain in your browser with slash ( http://simple-php.local/ ) Enjoy! Views: 55
3D Printing
Vacuum Cleaner Door Sills (2cm x 20 cm) – Staubsauger Roboter Türschwellen (2cm x 20 cm)
Free Download: https://www.tinkercad.com/things/6KKstfzeKil Video: https://www.instagram.com/tv/CiCtzOIDj8j Views: 15
Development
WslRegisterDistribution failed with error: 0x80370102
First you need the check if the CPU Virtualization in your BIOS. Second, check the Hyper-V Windows Feature, if this enabled. If both of them enabled, I had fixes this problem with the following codee and rebooting system. Views: 57
Development / Helm / Kubernetes / Linux / PHP / Server / Ubuntu
Cert-Manager – Kubernetes NGINX Ingress with Cert-Manager
Install Cert-manager is easy to install with Helm Package Manager. The first step is add Jetstack repository in our repository and becoming the package info with update Now we can install Cert-Manager with CRDs into our cluster: Cert-manager have also a kubectl plugin to easily manage configs and resources Configure for The Let’s Encrypt Certificate Views: 20
Development / Docker / Helm / Kubernetes / Linux / Server
Simple Private Docker Registry via Helm (as Helm Chart)
Overview Updated: 07.12.2022 – etc/hosts step added, all metada-name with release.name refactored, hostPath in values.yaml defined. Views: 33
Development / Docker / Kubernetes / Linux / NodeJS / PHP / Server / Ubuntu
Local Multi-Domain Kubernetes for Development with Kind + Ubuntu + WSL2 + Docker Desktop
Installation WSL2 installation on Windows Install Ubuntu on WSL2 on Windows Docker Desktop Download Configuration After the Docker Desktop installation we need to enable the following WSL integrations at Docker Desktop: Views: 43
Development / Kubernetes
Some kubectl shortcuts for bash automation (will be updated)
Get Podname via selector in bash, for example for port-forwarding Scale to 0 all deployment in whole namespace Views: 16
Development / Docker / Kubernetes / PHP / Ubuntu
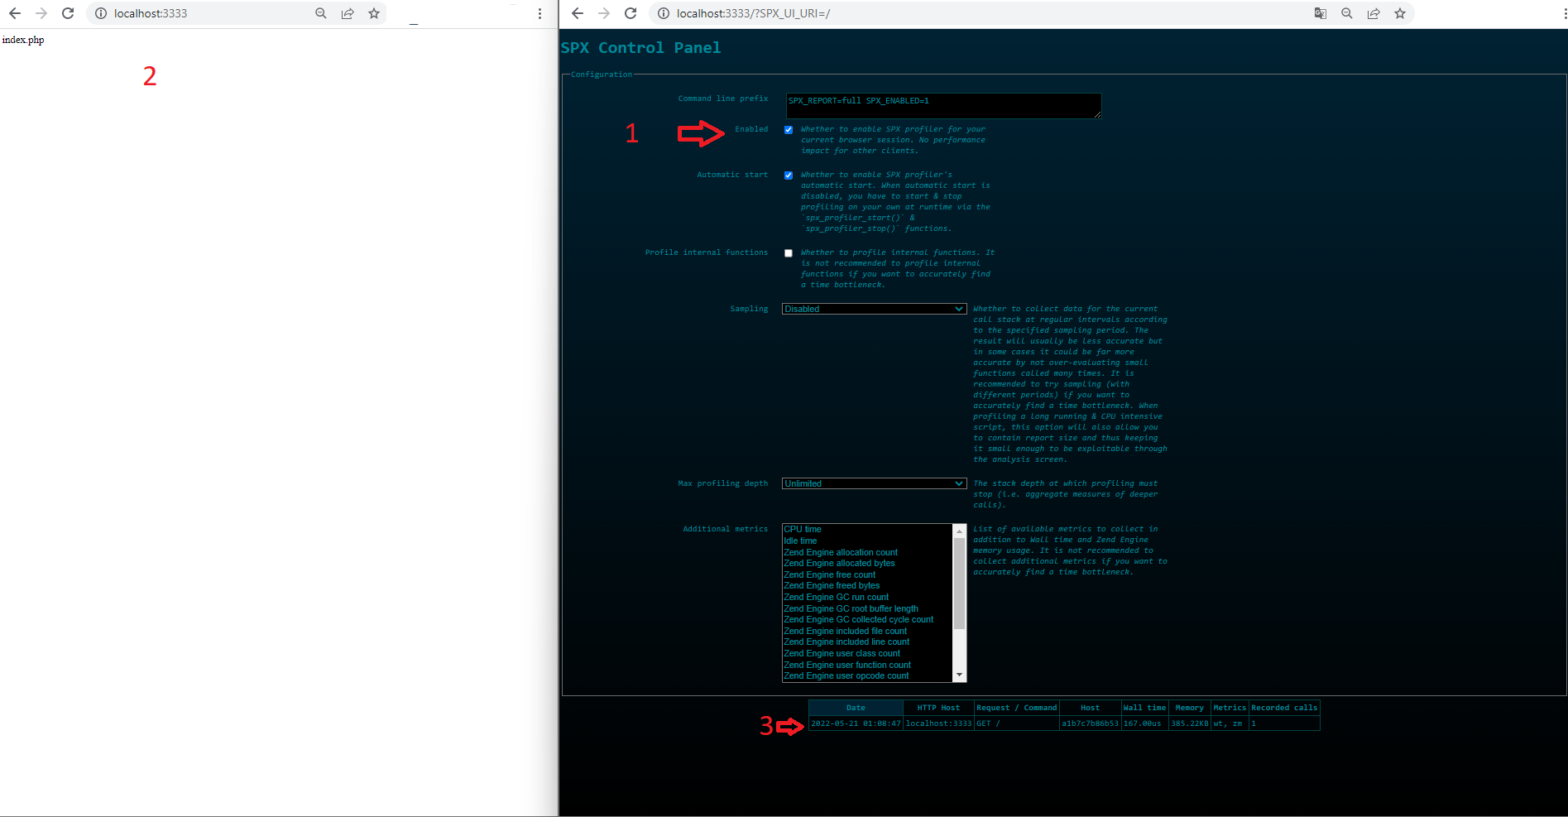
PHP Profiler SPX – A Another Simple Profiling Tool
SPX is a PHP Extension for Profiling, also open source, very simple, multimetric capable and with out-of-box web UI for listing, sorting and report details. For installation, we need to build our extension. We can of course put the building phases directly into our Dockerfile, but I want to know, what things (extension file, webUI Files and configuration changes) need to come through the extension. For this reason, I make a seperate build process in my Dockerfile and copy everything this extension needs. I follow the steps from official documentation (Timestamp: 20.05.2022), please check, if new or old steps were […]